
Remember that there are four ways to dial: Favorites, Recents, Contacts, and
Keypad.
The Contacts list isn’t the first icon in the row at the bottom of the Phone
screen. But it’s worth describing first, because it’s the source from which all
other lists spring.
Your iPhone’s own phone number appears at the very top of the Contacts list.
That’s a much better place for it than deep at the end of a menu labyrinth, as on
most phones.
Contacts is your address book—your master phone book. Every cellphone
has a Contacts list, of course, but the beauty of the iPhone is that you don’t
have to type in the phone numbers one at a time. Instead, the iPhone sucks in
the entire phone book from your Mac or PC; page 218 has the details.
It’s infinitely easier to edit your address book on the computer, where you
have an actual keyboard and mouse. The iPhone also makes it very easy to
add someone’s contact information when they call, email, or send a text message
to your phone, thanks to a prominent Add to Contacts button.
But if in a pinch, on the road, at gunpoint, you have to add, edit, or remove a
contact manually, here’s how to do it.
➊ On the Contacts screen, tap the ± button in the upper-right corner.
You arrive at the New Contact screen, which teems with empty boxes for
phone numbers, email addresses, and so on.
if your computer’s address book has a groups feature, which lets you add names
to subsets like Book Club or Fantasy League guys, you’ll find that they’ve been
synced over to the iPhone. (Mac oS X’s address Book program has groups, for
example.) in that case, you have to tap the group name you want (or all Contacts)
before you see the ± button.

➋ Tap the First Last box. The onscreen keyboard opens automatically,
ready for typing.

ordinarily, the Contacts list sorts names alphabetically, either by first name or last
name . There’s no way to sort it by company name...or is there?
Yes, there is. When you’re creating a contact, tap the First Last box—but enter
only a company name. Then save the entry. if you bother to go all the way back to
Contacts, you’ll see that the entry is now alphabetized by the company name.
You can now reopen it for editing and add the person’s name and other
information. The entry will remain in the list, identified (and sorted) by company
name.
➌ Type the person’s name. See page 20 for a refresher on using the
iPhone’s keyboard. Tap each field (First, Last, Company) before typing into
it. The iPhone capitalizes the first letter of each name for you.

➍ Tap the Save button in the upper-right corner. You return to the New
Contact screen.
on the iPhone, buttons that mean “Save,” “oK,” or “Done” always appear in a blue
box, where they’re easy to spot.
➎ Tap “Add new Phone.” The Edit Phone screen appears.
➏ Type in the phone number, with area code. If you need to insert a
pause—a frequent requirement when dialing access numbers, extension
numbers, or voicemail passwords—type the # symbol, which introduces
a two-second pause in the dialing. You can type several to create longer
pauses.
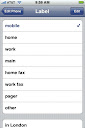
➐ Then tap the box below the phone number (which starts out saying
“mobile”) to specify what kind of phone number it is. The Label screen offers you a choice of mobile, home, work, main, home fax, pager,
and so on.
if that’s not enough choice of labels—if, for example, you’re entering your friend’s yacht phone—tap add Custom Label at the bottom of the label screen. You’re offered the chance to type in a new label. Tap Save when you’re done.
➑ Tap Save. Repeat steps 5 and 6 to enter additional phone numbers
for this person. If you want to input the person’s email address, Web site
address (URL), and so on, work your way down the New Contact screen
in a similar pattern.
➒ Add a photo of the person, if you like. Tap Add Photo. If you have a
photo of the person in the iPhone already, tap Choose Existing Photo.
You’re taken to your photo collection, where you can find a good headshot
Alternatively, tap Take Photo to activate the iPhone’s built-in camera
(page y). Frame up the person, then tap the green camera button to snap
the shot.In either case, you wind up with the Move and Scale screen. Here, you
can frame up the photo so that the person’s face is nicely sized and centered.
Spread two fi ngers to enlarge the photo; drag your fi nger to move
the image within the frame. Tap Set Photo to commit the photo to the
address book’s memory.
From now on, this photo will pop up on the screen whenever the person
calls.


➓ Choose a ringtone. The iPhone lets you choose a different ringtone for
each person in your address book. The idea is that you’ll know by the
sound of the ring who’s calling. To do that, tap Assign Ringtone. On the
next screen, tap the sound you want and then tap Info to return to the
main contact screen.
1 Add an email address, Web address (URL), if you like. Each has its
own button. You add this information just the way you add phone
numbers.
2 Add your own fields. Very cool: If you tap Add Field at the bottom of the
screen, you go down the rabbit hole into Field Land, where you can add
any of ten additional info bits about the person whose card you’re editing:
Prefix (like Mr. or Mrs.), Suffix (like M.D. or Esq.), Nickname, Job Title,
and so on. Tap Save when you’re finished.
To delete any of these information bits later, tap the – button next to it, and then
tap the red Delete button to confirm.